Monday, March 31, 2014

New Living Room paint & a Fireplace Makeover

Is it Monday already? I'm dragging this morning after a little too much of everything on a family trip to Sonoma Valley this weekend...

via Instagram
It's only a three hour drive but it was my first time in wine country—and it was beautiful. On the way home we stopped at a Barnes and Noble where I grabbed a copy of the latest issue of Cottages & Bungalows...


Anyone remember this room?

I was honored to receive a four page spread about the sunroom in our Florida house! (Special thanks to my girl Shayna @ The Wood Grain Cottage for showing me a sneak peek of the article before I could get my hands on a copy!)

Now that the weekend is over, it's back to reality—work and house projects. In between kitchen projects last week, we made time to spruce up the living room with a fresh paint job.

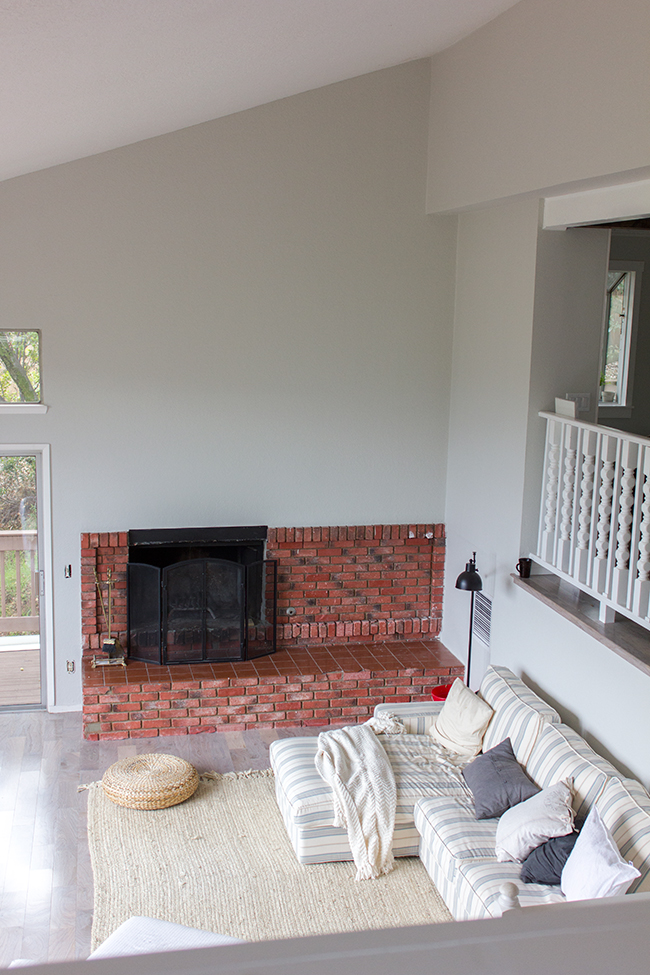
Here's how it looked in the very beginning:


And then after moving in, still very beige:


I decided to keep things open and airy so I used the same barely there gray I chose for the top half of the studio walls—Valspar's Montpelier Madison White.

We were going to tackle it ourselves, but this room has some seriously high ceilings—some of them directly over a staircase, and there was just no possible way we could do it. We found a local reputable painter (my parents use him all the time) and he made us an offer we couldn't refuse so we went for it.

And now it's like a whole new room.


Don't mind the random tv placement—we need to figure out how to move the cable box to the fireplace, so it's hanging out there for now.


The stair risers will be painted this week!


The paint was a huge improvement, but there was still a big eyesore...


This dingy red fireplace had to go.

My ultimate vision is stacked stone all the way up to the ceiling (maybe the same stone we used for our bar wall?) But this requires quite a bit of time/effort/money, none of which we're willing or able to dedicate right now.

So we went with the easy temporary fix—paint.

First I had to clean it up a bit and address some of the issues... like this:


And this:


It wasn't going to be perfect, but there were some obvious cracked/missing bricks that I thought could benefit from patching. I used "Presto Patch" which is a powder you mix with water and it forms a cement-like putty that dries and hardens rapidly.

It worked pretty well in areas like this:


The larger areas usually needed a few coats, so it took a little while to do the job. And it was a messy job.


I didn't go over every spot as it would have taken all day—I don't mind a little roughness. It's just temporary, remember.


I also had to prepare the tile surface by scraping and scrubbing off this sticky tape all the way around it...


After a few hours of prep, it was time to paint!

To keep the grays consistent, I pulled another color from the studio (we used it on our plank walls)—Valspar's Ocean Storm.

I didn't know what to expect as this was our first time painting brick, but it was not fun.


It took a lot longer than expected. The flat surfaces of the bricks weren't all that bad—just a couple passes with a roller brush. The grout was an entirely different story. It was difficult to get into every single nook and cranny.


We were up for a good part of the night just trying to get it covered. There are still a lot of small touch ups we need to make, but we're happy to call this project Done (for now).


Much better, right?


For a $40 gallon of paint, you can't beat it.


I haven't decided when I'll go ahead and pull the trigger on the stacked stone—we're going to live with it like this for a little while and see how the other projects pan out. I can't wait to build a nice chunky mantel for it!


For now, I'm just enjoying the fact that the red is gone and the living room feels a lot calmer.

I think this week we'll be focusing on the stair railing—it's an issue we've been putting off for a while now and it's a safety hazard that needs to be addressed. Check back later to see how things are coming along!


Thursday, March 27, 2014

Kitchen Chronicles: DIY floating rustic shelves

These last few days have flown by! With our housewarming party approaching in May, I've been tackling a handful of other projects. The kitchen is still our priority though, and our newest addition is one of my favorites...


Here's how it all began.

This open wall between the two windows needed something, and I thought would make the perfect space for a couple smaller shelves:


Originally I bought two of these from Ikea because the length could be customized to fit...


But after we decided on a white backsplash, it was just too much white. I needed a more natural element, and wood was the answer.

I spotted a couple tutorials on Pinterest that got my attention, like Ana White's floating shelves at YHL:


And these from Shanty 2 Chic:


Ultimately, I decided Shanty's version was simpler (+ required less wood) so I used that as my inspiration. They were a bit too thick for what I wanted, so I substituted the top & side pieces of wood for 1/4" plywood instead of 1" boards.

Because I would be staining the wood instead of painting, I splurged on the cabinet grade plywood ($30 for a 4x8' sheet) rather than the $15 cheap stuff.

I had Lowe's cut it into three 32" strips so I could transport it in my car...

via Instagram

I also bought a couple whitewood 1x2x8"pieces for the shelf supports, and a pint of wood stain.


After deciding I wanted my shelves to be 30" wide and 9" deep, I cut the 1x2's to the appropriate size—30" for the back piece and 8" strips for the depth. I used four 8" pieces for extra support since I was placing thin plywood on top instead of a thicker, more solid piece of wood.

Here's what all of the cuts look like, and how they would fit together on the right.


I spaced them out evenly, made marks then drilled pilot holes into both pieces so the wood wouldn't split...


Then I dabbed some wood glue onto the ends and secured them with 3" wood screws. These might have been stronger using pocket screws from my Kreg Jig, but I thought they were strong enough for my purposes (plus they'd be hidden).

Here's one finished support piece:


Next it was time to cut my plywood pieces. The top and bottoms would be identical, as would the sides, and then there'd be one front piece which would be slightly wider to hide the right and left edges of plywood. Here's how it went down:


The edges splintered a bit when I ripped them down with the table saw, so I went with it and decided to make these "rustic."

Time to get these babies up!

We were never going to find the studs, so we needed anchors that were long enough to go through both tile and drywall. I found these at Lowe's ($3 for 2)...


They were way overkill, but were the only ones I found that were long enough and they didn't break the bank so I picked up two packages (two for each shelf). I also had to drop $11 on a special 1/2" carbide bit made for cutting through tile.


It put up real fight. It took Brad several minutes to get through each one. These bits get real hot and smoky so I had to constantly spray water as he was drilling to cool it down.


After going through two batteries for our drill they were finally in. Then we slipped the anchors in and were good to go (actually, two of them broke off inside of the wall so I had to run back to Lowe's for more)...


Once that was done, we drilled holes into our support shelves and then secured it with the bolts that came with the anchors.


These shelves aren't coming out of the wall. The wood would split in half before those bolts came out.

Finally, it was time to build our shelves!

I attached the top & bottom pieces with 1" brad nails...


Now, I'm no Ana White—wood work is not my forte. My measurements did not end up perfectly and I was a little bummed. But then I remembered that in the world of rustic/farmhouse style, imperfections = character. And I remembered why I chose this style (or did it choose me because so many of my creations have been imperfect and I had no choice but to embrace it?) Either way... rustic for life.


Even still, I used wood filler to help conceal the most obvious seams and gaps.


But I also just went for it and banged it up a few times with sharp tools.


I wanted the color to be a neutral mix of gray-brown to tie into our wood floors, so I grabbed all three stains I had—Rustoleum in Driftwood, and Minwax in Dark Walnut and Ebony.


I played around with the mixture until I found a combination I liked...


Staining is always my favorite part. I could do it all day.


Once it was colored to my liking, I sanded down the edges to give it that extra distressed touch.


And finally, I sealed it with a few coats of Polycrylic I had leftover...


And now I have these beauties:


Sometimes I'll walk in the kitchen and just stare. I heart them.


The second the polycrylic dried, I ran to storage and pulled out some of my favorite things to display. I've got to save something for the official "After" photos, but here's a sneak peak I shared on instagram because I just couldn't wait...


Tomorrow morning we're road tripping to Sonoma for a weekend of wine tasting, but there's some major changes happening in the living room. I'll be back Monday to share!